Friday, February 18, 2011

Halflings. Thousands of them. The Exciting Conclusion.

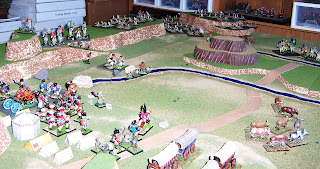
Turn two started with an all out advance by the Halfling amabutho. The right horn remained stalled due to fire from the spur, although one band, further west of the reluctant warriors pressed on.

The umBilbo continued to press the Goblin Border Guard and NMGC west towards Mkene Hill. Mind you a troop of the NMGC managed to get of a fairly effective volley, but it was not enough to stem the tide.

The Halfling left horn continued to chase Dangsforc. One of his troops managed to dismount and fired a very effective volley that stalled the advance of the oiVey for a while (very lucky volley for the Goblins and several very unlucky morale checks for Halflings saw half the oiVey go to ground)!

The real drama took place in the Notch as the iNithobbitholeskhosi charged the Rocket Battery. Despite rocket and howitzer fire the warriors swarmed over the Battery. The Gunners died by their trough like proper Orcs.
Rocket Battery overrun.
At this point two stands of Halflings have been lost. Only 242 more stands left. The fur feet don’t stand a chance!

Turn 3:
Halflings advance. Goblins fall back. Howitzer pots some Halflings. Halfling left horn still in disarray.
Lt. Col. Dangsforc manages a deft withdrawal.
Turn 4:
The firing line is engaged. Three companies of the 1st/24th are now engaged against the iNithobbitholeskhosi and umBilbo amabutho. Their fire coupled with that of the howitzer section holds the enemy at bay for now.
Fire!
Meanwhile the NMGC and NGC scouts on the northern side of the battlefield have regained the camp and are held in reserve.

Dangsforc’s NMGC are hotly engaged south of Amatutshane now that the oiVey have sorted out their battle order.

To the east, the uNodproudfoot corps has disappeared from Orcish view and are starting to circle round behind Isandlwana.

Turn 5:
The Halflings almost make contact at several points along the line but all are forced to ground. The Nek seems to be an untenable position for them although they may have better luck on Mkwene Hill.
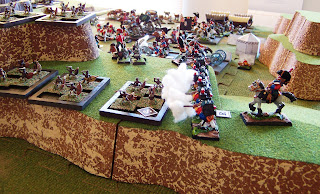
Hotly Engaged.
Turn 6:
The iNithobbitholeskhosi continue to take a beating in the Nek. Halflings spread out left and right around the Orc line.

Disaster strikes when one group of Halflings charge home and eliminate a unit of the NGC in the corner of the Orc line. The firing line has been breached.

Turn 7:
Both Orc flanks continue to be pushed back as the oiVey and umBilbo continue their advance. On the congested terrain of the spur, the umBilbo are unable to take advantage of the breached firing line although the situation is far from stable from an Orcish perspective.

In the center the iNithobbitholeskhosi have stalled.
Halflings go to ground in the beaten zone.
Col. Henry Lugdush had good reason to be pleased with the course of the battle so far. Until that is, Giglamps returned from the spur to report the presence of a large body of Halflings (the uNodproudfoot corps) marshalling on the east side of Islandlwana.
"To the rear? Good Sentinel Orc!
Turn 8:
Lt. Col. Lugdush barks orders to see to the protection of the rear. He sends Giglamps galloping to Lt. Poke requesting he recall companies A and H to the camp. The Col. also sends the reserve companies of the Naal Goblin Contingent led by Capt. George Sheepston to the block the approach along the road between Isandlwana and the conical kopje. The light horse he sends south of the conical kopje to take the Halflings in the flank. Finally he orders company G to support the NGC.
Captain Sheepston leads the NGC to protect the rear.
The oiVey make a determined rush on Col. Dangsforc’s retiring troops and are once again brought to ground.

The Balrogu Troop of the NMGC in action.
The umBilbo continue to work around the Orc’s flank causing companies C and F to withdraw slowly down the spur towards camp.
Falling back by companies.
Turn 9:
It all goes a little bit pear shaped.

The Orcs continue to carry out their redeployments started last turn.
Lugdush redeploys to meet contingencies.
This turn the Halflings manage to come to contact with their foes in one each flank and in the rear.

As C and F companies continue their withdrawal both are charged. Fire from E company saves F. C is not as fortunate and the horde of hairy footed fury crashes into their line! This time it is the Halfling’s who roll well and C company is eliminated. A company of NGC right behind them doesn’t much care for their chances and routs away as well!
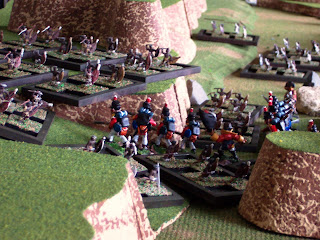
The right flank crumbles.
The uNodproudfoot corps succeeded in charging the NGC company blocking the wagon road and destroy it! This outcome was not unexpected, and thankfully the second line NGC company did not rout.

Finally I appear to have cut things to fine indeed with Dangsforc’s contingent of Naal Mounted Goblins.The Balrogu Troop was caught by the advance elements of the oiVey They survived the melee with some loss but alas the strain was too much and they lit out for parts unknown.
The end of the Balrogu Troop.
Turn 10:
The collapse continues.
An abortive charge by the NGC on the wagon road ended in disaster. Capt. Sheepston and another company eliminated. The mounted troops south of the conical Kopje also met with disaster and the all of the mounted auxiliaries, save for Dangsforc’s Isendale, troop have fled.
Charge of the uNodproudfoot.
Company F is eliminated. The Halflings swarm into the camp eliminating Captain Daggurshire, acting CO of the 1st 24th, what with Lugdush in command of the entire force.

The Halflings are in amongst the caissons of the Royale Artillery.

Have now lost 3 companies of Orcs, three of NGC , the Goblin Border Guard, and three troops of NMGC.
The outlook is bleak.

Turn 11:
Lt. Col. Lugdush has seen the end coming. He instructed Lt. Giglamps to take the Kyng’s Colour of the 21st and make for Orc’s Drift.
Giglamps is instructed to save the Kyng's Colours.
He continues to gather the remaining three companies of regulars about him.
Halflings pouring into camp.
G company is overrun on the wagon road.
Giglamps flees as G company is overrun.
Lt.Colonel Dangsforc is killed and the Isendale troop, fights on for a bit until they too flee the scene. The howitzer section is overrun.

Turn 12:
At this point Lt. Giglamps has left the table. Here is what ensued next based on the position of the
bodies and survivors’ accounts.

The NGC fled as best they could.

Lt. Col. Lugdush formed A and H company into square.
Stand and Die like Orcs!
The troops battled on until the inevitable end.

The Halfling’s tell of Lt. Col. Lugdush fighting, game to the end. Eventually he faltered, his stamina wasted away through dozens of tiny assegai wounds…
Last Stand.
Final losses were essentially the entire Orc command although of course there are numerous fugitives from the Colonial units and a few Redcoats as well.

The Halflings lost 34 warbands of about 100 Halfling’s each. Mind you not all of these were casualties as some ran off, and others were simply retired as combat ineffective. I’d guess about half that, or 1700 did not survive the day.

Some game notes:
The Halfling suffered from terrible dice rolling throughout most of the game, with full strength units going to ground when their comrades faltered. However they more than made up for this at game’s end when they consistently rolled high vs. Orc regular companies, who in their turn consistently rolled low, leading to several devastating melees between nominally equally capable combatants.

The Naal Mounted Goblin Contingent and other Colonial Horse did sterling work and should not really have been expected to stave off the uNodproudfoot Corps at the end.

The Naal Goblin Contingent did not rout nearly as often as I expected them too…which only led to their deaths in close combat.

I’m perhaps most surprised at how closely the game stuck to the script, following almost exactly the historical series of events.

For my part I tried to act upon the information that Lt. Col. Lugdush would have been aware of rather than whatever could be seen on the table. Be that as it may I really botched the withdrawal from the Spur, leaving it to much too late and losing 3 companies and the gun as a result.

Still no one should play Isandlwana as the Imperials and expect to win.

After playing a few small games on the Isandlwana set up which will probably not be reported upon, you, dear readers, may expect to here of Lt. Giglamp’s adventures as he rides to Fugitive Drift, and hopefully, beyond!

Until next time…

Tuesday, February 15, 2011

Halflings. Thousands of them.

The Rocket Battery comes into action.
The Halfling amabutho have appeared on the table to the north and northeast. This appears to be the tip of the main impi judging from the numbers of warrior spotted.

The NGC and NMGC scout detachments are withdrawing on the camp.

The Rocket Battery, hastening to catch up to Dangsforc was caught out on the west side of Amatsushane. Being too slow to run they deployed and fired! The rocket left the launcher and sputtered out on the ground a few yards short of the enemy. Not a terribly good start. Here's hoping they will get off another shot.


Meanwhile company E up on Tahalane Spur has been reinforced by company F. The two companies did sterling work firing at the Halfling right horn passing east towards the rear of the camp. For the moment the progress of the Nodwengu corps has been arrested, the furry footed warriors gone to ground for now.
The 7 pdr section has been deployed covering the Notch in order to provide some covering fire for the withdrawal of the Naal Goblin Contingent and Naal Mounted Goblin Contingent units returning from their scout.

Col. Henry  Lugdush has retained a further company of the 1st/21st and 2 companies of the 2nd/21st in camp to meet contingencies.

Game note: Only managed one turn today as I had to construct a rocket trough and ran into some rules questions. Not rules questions exactly. Rather I've hit on a new way to handle some aspects of the game. The rules intended for use were the large scale skirmishes based on Flintloque by Alternative Armies .

Had a bit of a revelation overnight and have streamlined some processes and dropped others to a system where in each company has four subunits that each correspond to Flintloque "sections". This detail is not really important to play, simply something to keep in mind when assessing the scope of an action.

Need to review a few Flingloque concepts before continuing the action...

Sunday, February 13, 2011

The Fords of Isandlwana, Morning in Naal

Troops formed up before the camp.

It is with regret that I must inform the members of a disturbance in Naal.
Crown troops and a company of  NGC on watch.

It appears that some of the tribes do not appreciate our guiding hand and would prefer not to be civilized by the HEVC.
The dissidents, led by Shaka Sackville-Baggins, have moved their Kraals to the hinterlands taking Company property with them.


The Naal Caribiners, Naal Mounted Police, and Buffalo Goblin Guard.

I am pleased to report that I am proceeding in company with a column consisting in the main of the 21st Eyes n' Gourds. The regiment is part of an expedition that has been dispatched in pursuit of what are believed to be a few dirt scrabble rebels.
Naal Goblin Contingent troops out scouting. The rocket battery and its
escort can just be glimpsed beyond Amatsushane
We may rest assured that Lord Chumpsford will have matters well in hand by Cryptmas.
Col. Dangsforc leads the NGC horse up the Qwabe valley.

Your obedient Servant,
Giglamps
The fords of Isandlawana, Naal
Giglamps may just be seen, mounted, outside the Command tent,
 listening to morning services.

Friday, February 11, 2011

Flintloque - War in Catalucia

Finally added a flag to a unit of dodo riders today. The flag is from Warflag.com . At least IIRC it is.

Having finally given them a standard thought I might as well give them a go at someToads.

The photo shows the climax of a game of scenario 2 from Flintloque - War in Catlucia , where in a Goblin patrol must push through a Toad infantry unit with urgent dispatches for their commander.

As the Goblins were all dodo mounted I figured they would just push down the road at best speed. The Toads deployed their officer, standard, and singer on the bridge itself, while the 5 musket armed Toads fanned out along the river to take the 5 Goblin riders under fire.

The initial Toad volley brought down the dodo of the Goblin sergeant. The remaining birds trotted on to the bridge. In the ensuing melee, the Toad officer and singer were ridden down, while the standard bearer un-dodoed his goblin.

Chaos reigned as it was each Toad for himself and the firing line more or less disintegrated.

Eventually enough the Toads rallied to fire off a few more shots and another dodo brought down but its rider was carried to safety by the Goblin leader.

In all three dodos were felled and two of the five Goblins had to retreat back the way they had come. However three Goblins on two dodos got through securing victory for Al-Garvey.

The Toads lost their officer and singer with one musket Toad routed off table.

Better luck next time mi amphibien!

Tuesday, February 1, 2011

Cacabelos, January 3, 1809

One last game before putting the snow terrain away. I had actually devised a Cacabelos scenario back in February of last year. The game was played a few times using both Flintloque and and an early version of Muskets and Mohawks 2 which should be released later this year. It was a fun game, and yet I hadn't any snow terrain back then so...

This time around, I used the scenario provided by Capitan Games.  This version of the fight leaves out the British artillery which makes for a faster and more balanced game. "Leaves out" is not quite the right term as the guns are presumed to be off table to the west and any French forces that exit the table would have to face them before rampaging through the rear area of Moore's retreating army. However rather than Capitan, the rules used were a variation of Flintloque that is my current fancy.

Here then is the situation at start. General Baron Auguste Colbert, at the head of two squadrons of hussars, must advance across the bridge over the Coa and west along the road, brushing aside General Sir John Moore's rear guard.

That starting positions
At the start of the third turn, Colbert is reinforced by a squadron of dragoons and two companies of Legere. These troops appear to the north and are able to take advantage of a ford across the Coa rather than having to use the bridge.

British forces consist of two companies of Rifles, deployed to the south of the road, using olive groves for cover. In addition a company of line infantry holds position just west of the ford, north of the road. A further company of light infantry holds a position astride the road about three quarters of the table to the west.
Sir John Moore, Lord Paget and Staff

Finally Sir John Moore and Lord Paget direct the action from a rise on the west end of the battlefield.

For this solitaire game I will take the role of the dashing Colbert, while the game system runs the ros bifs.
The "AI" for the British is nothing fancy. They will hold position, fire when able, and fall back when flanked. Should one position be threatened there is a chance that the nearest unit will reinforce.

In keeping with the scenario, the French have 8 turns to exit a unit off the western table edge. The movement rates used in Flintloque and Capitan are similar enough that this time limit ought to suffice.

There is also a special rule that should Colbert be killed (as was historically the case) the French may not move any units on the following turn.
Avant!

Now as a gamer I should have moved across the bridge and made a sharp left to charge the line company holding the ford.

However the urge to work with only the info available to Colbert was too strong! How could this rabble, this army of drunkards and malcontents stand up to the flower of French cavalry? Their stragglers line the road for miles, passed out drunk or worse and it should be only a matter of a determined charge to send them flying away towards their ships.  And so the action began.
Auguste Colbert  leads the charge!

Before long shots rang out and the skillful marksorcs of the rifles put paid to Colbert and decimated the leading unit of Hussars.
La mort de Colbert

The second turn saw the Hussars milling about taking more casualties.

On turn three the reinforcements arrived. The Legere fanned out along the east bank of the Coa while the Dragoons remained mounted in reserve.


Reinforcements


The British Line was able to reform facing east to oppose the new French arrivals.
End of Turn 3
Meanwhile the Rifles checked fire having run out of targets for the moment, while the remnants of the first Hussar unit huddled in the shelter of a mill on the west bank of the Coa.


Turn  4 saw the British Line and French Legere exchanging fire. There were casualties on both sides but both formations held their ground.

With a lucky set of initiative rolls the French were able to launch a second attack on Turn 5. The remnants of Colbert's lead unit took the British Line in the flank, while the second untouched Hussar unit in Cacabelos itself charged across the bridge. This advance had the dual purpose of starting a rush for the west table edge as well as screening the first Hussar unit from rifle fire.
La deuxième avance
Surprisingly, the Line were not sent flying, nor rundown at first blow. Hot dice will do that on occasion!
A heated melee
 With the Line giving as good as they got, the Dragoons advanced across the Coa.
Dragoons à l'avant, l'avance
 Beset to front and flank by horse, the Line company broke!
Exécuter rôti peu bœufs exécuter!

At the same time the reserve Hussar squadron made good headway along the road advancing into a veritable storm of fire.
Death-ride de hussards!


Still they road on...to victory!
Exit, Stage Right!
by the start of turn 8, with their left flank in the air, and French cavalry in their rear area, the British began to withdraw. Each company fell back by sections while the dragoons continued their advance.
La journée est à nous!
 That was a fun one. I am not convinced that one understrength Hussar unit would be able to do much other than die in front of the British guns off table, but the line of the Coa has decidedly been breached. I was also a bit concerned about the lethality of the Baker, urh "Bakur" rifles in the hands of skilled rifleorcs. Still the second unit of Hussars with some lucky initiative rolls had been able to run the gauntlet. Also for a fantasy game rifleorcs should be dead hard, just as French (Ferach Elf) horse should be brave even unto death.

Well finally its off to sunny Afri. There's unrest in Naal and my dear ward Giglamps has been attached to Lord Chumpsford's staff...

Jusqu'à la prochaine fois, M. Sharke!