Thursday, September 29, 2011

Musket and Mohawks 2 Field Battle

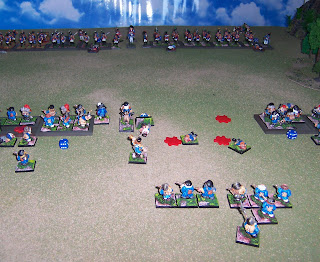
 Was able to test the largest encounter in Muskets and Mohawks 2 today, The Field Battle. In this encounter your company takes its place in the line of battle during a field engagement. The game is still played at 1 figure equals 1 man scale and the game shows only that part of the battlefield directly to the front of your company. 

A full game company consists of 1 Captain, 2 Lieutenants, 2 Ensigns, a Sergeant Major, 4 sergeants, 8 Corporals and 40 other ranks. That's all four sections of your company plus the command element.

Now as it happens I do not have nearly enough period figures for this large a game and so substituted Napoleonic troops for this game. My company would be French line while the opposition were Prussians. Also while I say "my" company, my character was in fact the Lieutenant of second platoon. The Captain was a non-player character as were all of the Prussians.

The battle featured a French attack so the Prussian company deployed on table and my company entered from the opposite long edge. 

Due to some random events my company received an order to halt our advance while still out of musket range of the enemy. While waiting for our advance to resume I lost two men to cannon fire, another random event.
 We were finally able to resume the advance! Unfortunately the Prussians were able to get in the first volley and dropped several of my men.
 The senior section of my company was obscured by a small cluster of trees on our right, which offered them cover but also prevented them from bringing all of their firelocks into play. 

One aspect of this game that I am very proud of is the way it presents you with the problems of the black powder battlefield. In larger scale games columns just move faster than lines. At this level you see the terrain that causes lines to break up and move more slowly than columns. As it is a company would always form line unless navigating tight terrain, and here rather than disrupt my formation I decided to just keep the senior section out of action for a bit.
 We began a brisk exchange of fire with the Prussians. Slowly we began to achieve the upper hand, inflicting more casualties to the Prussian leadership than we received in return. This was all down to the luck of the dice.

Another aspect I am pleased with is the frequency of misfired. Initial vollies are very powerful and then fire sort of goes in spurts as casualties and misfires contribute to a decline in the volume of fire. Eventually misfires are diagnosed and repaired and some of the casualties return to the firing line, and volume of fire picks up for a while until the inevitable misfires and casualties reduce it and so on.
 Eventually one of the Prussian platoons had suffered too much and withdrew behind the firing line.
 The company sergeant lost no time in attempting to rally them. Here then was my chance! Our company commander ordered the charge. However he had considerable difficulty bringing the men under control and they continued to stand and fire.

Once troops begin to fire it is sometimes difficult to bring them back under orders. In this case I had considerable difficulty bringing them to heel.
 Fortune smiled as a half section of light infantry was sent to our aid. They took up position in the wood in front of the senior section and opened an accurate fire on the Prussian left.
 At about the same time the Prussians suffered a couple of round shot from our artillery. Random events can cut both ways. 

To their credit the section that had retired returned to the line for more punishment.
 Still unable to get our men to move  I was bit disconcerted by the arrival of a Prussain gun behind their lines. Clearly the higher command could sense the weakening of Prussian resolve and sent the gun to stiffen the line.

Reinforcements can be granted via random dice rolls. Like random events they cut both way too.

 It was a race against time now. Our fire had significantly weakened the Prussian company and individuals were starting to slip away from the firing line. .
Their sergeants managed to whip most of them back into line but in ones and twos some headed for the rear
 The Prussian deployed the gun behind their line. Presumably they would retire behind the gun once it was loaded.
...And still our Captain could not bring the men under control. Our fire was to good effect but if that gun started hitting us with canister we would be in a bad way.

 Finally our men were brought under control. Our firing line went silent as the officers and sergeants dressed the ranks. 

Only the sniping of the light troops continued and the Prussian fire grew increasingly ragged.

 At last we began to advance. Avant!
 When charging the attacker moves to only 6" from the enemy. Opposed dice rolls are then made to see if the attacker baulks, takes fire at close range, or the defender stands for melee (rarely) or legs it.
 The Prussian line evaporated before our advance!
 The day was ours.
Final losses were 11 French other ranks. The Prussians lost more than twice that many and the gun.

Post battle rolls should see my character gain some recognition. Had we lost he might have had to fight a duel if brother officers were to cast aspersions on his conduct. However as one of the victors he may be able to grab some of the glory.

Hope you enjoyed the report and thanks for stopping by!

Tuesday, September 20, 2011

Giglamps' Impi

Giglamps has committed a near unforgivable sin. Grievously injured though he survived the greatest disaster to strike His Majesty's troops in Afri.

Worse yet, some have insinuated, nay outright stated, their belief that Giglamps was not acting under the orders of the late Lt. Col. Lugdush of the 21st Eyes N' Gourds when he departed the field of the Fords of Isandlwana. No, so they say, Lt. Giglamps grasped the Kyng's Colour of his own accord in a craven effort to save his life!

Giggers could stand the backhand glances and snide comments of hi "Brovver" officers. That was only to be expected. However when he received the White Fang from his intended. Miss Abigal Goodtrhashing it was all too much to bear.

No~ This would not stand and so he resolved to recover the Colour lost at Fugitive's Drift of die in the attempt. After recovering from his injuries he set about infiltrating the Halfling Impis. In "Sproglets' Own" fashion he lost no time in learning the Halfling's speech and altered his appearance so that he might move about them undetected...if a bit awkwardly as he had to leave his spectacles. a sure sign of his civilized nature, behind.
Giglamps gone Halfling
Above is a simple conversion of an Alternative Armies Orc to stand in for Giglamps as he move about Afri like the very wind...

Added an Iklwa made from pressed florist's wire and a card and florist's wire shield. Ended up repainting most of the old boy to repair damage to his original paint job sustained during modification.

More on his adventures in future installments.

Thanks for dropping by!

Monday, September 19, 2011

Jungle Ambush

The Trail
 As noted before this game was a small game following the exploits of Captain Gout and a detachment of Madnas Goblin Infantry as they pursue raiders from Eyesore.

All is not as it seems however as the Eysorians have left behind a party to ambush their pursuers.
PEF (Possible Enemy Force) 1 The Flank Attack
 Three Possible Enemy Forces have been deployed on the table.  PEF 1 is positioned to strike to the Orc Captain's right flank as his forces cross the table. PEF 1 might be a figment of tattered nerves though and may not yield any troops.

PEF 2 (The Reserve)


PEF 2 is positioned in a nullah that bisects the table. An enemy here would be well protected ad blocking Captain Gout's route. 

Such a well placed foe could hold up the advance of the Madnas party indefinitely.

Like PEF 1, however, this too may just be a case of Gout's overwrought senses.

PEF 3 (The Ambush Party)


PEF 3 is the ambush party. Whatever else may happen, this PEF will yield enemies.

The only question is how many and would they be able to lie in wait long enough to inflict maximum disruption to Gout's crossing.

This PEF was placed in a bend of the trail about halfway across the table to the left of Gout's line of march.

I would be taking on the role of Captain Gout leading a detachment of MGI with Havildar Shazbag as my second in command. The detachment consisted of 17 goblins drawn from the light and grenadier companies of the battalion. As such my goblins were a nice mix of Rep's 4 and 5, armed with standard smooth bore muskets. We also had a Commissariat Sergeant leading two pack lizards with rations and additional food.

The Encounter had my scouts, two goblins detached for this purpose, starting out halfway across the table near the ambush party. 

The rest of my command was strung out behind me in two files, barring the final two goblins who were tasked with guarding the rear and the pack lizards. Quite naturally I rode at the head of the goblins. Wouldn't due to have the goblins think their orc officer was skulking about the rear eh?

PEF 3 Revealed
The Eyesorians proved stealthy but  ill disciplined and they opened fire as soon as my scouts were abreast of their position.

The ambush party resolved into a mixed group of 12 otters and goblins armed with an assortment of missile and melee weapons.

Out of the undergrowth came a barrage of arrows and musket balls punctuated by the Boom! of a rather large blunderbuss wielded by the Eyesorian leader.

Both of my scouts were dropped by the initial fusillade  although how badly they were hit I was as yet unable to determine.


Ambush!
 Wasting no time I had the goblins double up to the point of contact, where  Havildar Shazbag and I paused to shake them into line.
Havildar Shazbag leads the troops...
 During this time the goblins showed great discipline and restraint, calmly carrying out their evolutions all the while under a sporadic fire of shot and arrows from a foe barely glimpsed through the underbrush.

I thought one controlled volley and a spirited charge ought to be enough to drive off these villains and allow me to tend to the scouts..


...and pays the price

It was as this time that a ball hit Havildar Shazbag. The valiant goblin clutched at his chest and fell to the ground, all the while encouraging his "lads" to be steady.

At this point one of the otters let out a, well,   I trust you will not think less of me for saying so, a positively bone chilling cry.

Brandishing a wicked looking tulwar and followed by two similarly armed goblins the otter crashed out of the brush and straight for us!
The enemy charge!

I well thought the scouts were done for as one goblin made for their prostrate forms while the other two Eyesorians charged headlong towards our line.

By Sentinel! One of the scouts rose from where he lay and set too with the goblin, protecting his comrade from harm.

This, along with the gleaming row of bayonets my detachment presented soon saw the Eyesorian charge repulsed!


The enemy fall back with loss
The wounded scout even managed to drop his goblin with some deft bayonet work!

I could fell the spirits of the goblins buoyed up by this turn of events.

Demned fellahs looked fit to cheer so I promptly quietened them down, calling for quiet in the ranks.

A controlled volley
 Decided to help the retiring Eyesorians along with a controlled volley! Could barely see the rotters for the smoke and the undergrowth.  'Od's Fish though the sound of shot singing through the trees was lovely. Even heard a whelp as one of our missiles struck home.

Charge!
 "Now me fine Goblins, at them with the bayonet!" I cries spurring Gobbers into a trot.

Well if any of the Eyesorians still thought to contest the matter, this advance of 15 fighting goblins made an end of it. They broke and ran and that was the last we saw or heard of them.
Driving them off

Nullah scouted...
 There was a dicey moment or two when the scouts stumbled upon this steep, what they called, "nullah". Thrice Demmed country has more folds and creases than that Miggens womorc old Rogipoos keeps on about!

...and crossed
 Fortunately for them, no Eyesorians were anywhere about so on we trudged on  looking for a good spot to camp for the night.

The detachment on the march

Bringing up the rear
So there you have it. A short, sharp, action that must have been repeated thousands of times throughout history and yet rarely considered worthy of inclusion when the histories are written.


Final losses were one Eyseorian goblin killed, and at least two other Eyesorians wounded based on the blood evidence.


Honorable East Valonian Company losses were three other ranks wounded. Both scouts were well enough to carry on with their duties having suffered only minor injury. Poor Havildar Shazbag had to be pensioned off to live out his days as best he might.


The new volley rules worked splendidly and I am excited to carry on with this project. That project being "Muskets and Mohawks II".


The tweaks I made to the ambush encounter were less spectacular but repeated play will see if they have value.


Seems to me that you can't really do a Colonial  American game without ambushes as they were such a feature of the small fights that sprang up all along the east coast of the continent.


Yet the challenge is to make it exciting to play through. A perfect ambush where one side delivers a crushing stroke with well concealed yet overwhelming forces may be the operational objective but would lack a certain entertainment value...for the ambushed player at any rate.


In any event hope you enjoyed the report and thanks for stopping by!

Next up wiii either see Giglamps attempt to redeem himself after the loss of the Colours at Fugitive's Drift, or a thorough testing of the artillery and mine rules as the Albion orcs assault the Ferach held city of Badajobz.

A note on terrain: Much of the terrain used in this game was purchased from Battlefield Architect, with additional items from The Terrain Guy, Warzone GTS and Lemax, as well as the odd bit of Dwarven Forge.

Sunday, September 18, 2011

Up Next: Bungle in the Jungle

Captain Gout, seconded from the 21st Eyes N' Gourds, cursed his luck for the hundredth time. There was a proper war brewing in Catalucia and here he was chasing bandits in some Sentinel foresaken jungle!

Worse yet he was leading a detachment of flanquers from the 6th Madnas Goblin Infantry battalion. D*mned Nosey hadn't even seen fit to give him some proper soldiers like those Johnny Otters of the Mahrotter Confederacy.

No! Here he was marching off to who knows where tasked with recovering some livestock stolen from the Nizam of Hyderagud's own herds. Naturally the trail led straight to the territories of Eyesore. The Tipsy Sultan had been rattling his sabres ever since old Corngrommit had let him off the hook. Had the orld beggar dead to rights and off Gentleorc Johnny goes declaring peace at last. Dracci take the lot of them...

Just then some movement off to the left caught his eyes, dragging him away from his self-pitying revelry.

About to try out some new rules for Muskets and Mohawks II. Seems that every time a game's publication is delayed, it is just as well as there is one more opportunity to make sure it does what you want it too.

While this encounter is designed for the wooded north east of North America, I just couldn't resist using some new and old jungle terrain and setting the game in the run up to the Fourth Mysore War, Flintloque style of course. 

More to come as the action unfolds. Actually its here.


Saturday, September 17, 2011

Vimeiro II

View from left flank of Elven positions.
 Took a break from some other projects to play the Slaughterloo Vimeiro scenario again. Once again I took on the role of the Elves of the Emperor and allowed Kynge Gorge's Orcs and their skirted Rat lackies fend for themselves using some common sense and some dice.
105th Rifles about to be flushed from cover.
 Things went much better for me this time. My heavy battery forced the Orc battery on Vimeiro Hill to relocate over the crest and out of harms way while my Chasseurs a Pied kept the Orc lights busy.

As the Chasseurs fell back one Elf and one Dog battalion began an assault on the hill in assault column. The 105th Rifles fell back in disarray as the Elves of the line fought through the hedge on the left.
On the right side of the field, the Hussars de Juennes were able to dispute a small hill by arriving there before the Joccian Rats of the Starthcarnage and Kilmore. In fact the rats, not having had time to form square were driven back by the advance of the horseelves. The following Orc battalion was able to form square but the Rats were still dressing their lines when Ferach heavy battery unleashed a round of grape, and the Hussars charged home.

Avant! The Elves concentrate force on the Orc left.
The third Ferach line battalion drew up abreast of the battery to lend support which proved to be just as well when the Orc 10th Hussars charged! It was a magnificent effort but the Elves were able to hold their ground and drive the horseorcs from the field.

Now down to half strength, the Rats withdrew behind the square of their Orcish fellows. Said Orcs being in a bad way with Hussars prowling about and and a heavy battery and line battalion in support.

Only one Orc battalion remained uncommitted, on Vimeiro Hill itself. With two line battalions approaching from the front and the collapse of the square only a matter of time, the Albion command ordered a withdrawal.

Good fun as always and I think the very first time I have prevailed against Albion. Huzzah!

Thanks for stopping by!

Thursday, September 8, 2011

The Fiend of Bricole: Conclusion

Rats on the run
 In this game Hengist must run down the fleeing Fiend before he can slip back into the night. This was a Pursuit encounter, familiar to players of Two Hour Wargames. However for this game I dusted off the original Posse encounter rules from Six Gun Sound. More about this in the game notes at the end.

 Forces:
The Wererats were the runners.
Fiend Rep 5, Hardiness 3
Henchrat Rep 4, Hardiness 2

Of the six other rats from the last game, two had fled the field, three were out of the fight, and one was Obviously dead.


Hengist's party were the chasers

Hengist, Rep 6, Hardiness 3
Silva, Rep 5, Hardiness 2
Bors, Rep 5, Hardiness 2

Alphonse was knocked out of the fight in the last encounter and so did not participate. Further Bors was left behind to tend Alphonse and to see if any of the rat casualties could be made well enough to be put to the question should the Fiend successfully escape.

 You can see the table set up above and to the right. As this game would not be using the grid movement of the standard Fiend encounters, it was laid out to cover a 4' x 3' area depicting the edge of  town and the beginning of the countryside beyond.

Most of the pursuit would take place off table with the figures only being placed once/if the chasers closed to within 2 feet of the  runners.

The two sides started with a notional 50" of separation.

 At its greatest the lead stretched out to 55", however Hengist and Silva were able to slowly run the rats down. By turn 10 the lead had decreased to 39". By turn 13 it was down to 29". 
On turn 16, with both sides now on the table  the lead was down to 14". It still being night time, good visibility  was only 12". However Silva's bow was deadly at that range while the Fiend's shurikens would fall far short. The rats knew it was time to find a spot of cover from which to make a stand.

On turn 17 Silva was able to get off a shot at the scampering rats. Sadly the shaft flew wide.
The rats disappeared around the nearest corner and waited. 

Hengist and Silva rounded the corner to find the rats waiting for them only inches away!


The henchrat charged Silva while the Fiend and Hengist sized each other up.  

As the Silva and her opponent traded blows, Hengist and the Fiend traded shurikens and lead.

The fighting and shooting went on for some three turns with no one getting the upper hand. 

The Fiend survived two shots that would have dropped an ordinary rat, and yet he fought on.

Silva would have felled her rat were it not for deft shield work on his part. Again and again Silva nimbly dodged his blows. For his part the rat capered and spun using his sword and shield as if there were extensions of his very ratty being.

And then the unthinkable happened. The rat broke through Silva's parry and delivered a death blow. The lithe Elf fell to the floor never to rise again.
The rat's triumph was short lived, soon turning to despair  Hengist was enraged by the death of his friend. Where before the Brother had been content to bide his time and wait for an opening, now his rage unbalanced him.

Eyes burning with hatred Hengist charged the rats with such fury that they let fly the musk of fear and fled before him. 

Hengist would not be denied his revenge and in time caught both fleeing rats and ended their verminuous existence.

It would be some time before the people of Bricole de Gribeauval would sleep soundly at night, but for now at least their terror was at an end. The Watch would be able to deal with any remnants of the assassin's pack in the days and nights to come.

With heavy heart Hengist would lead Bors to Haven on Trent while Bors remained abed recovering. 

Silva would be missed, but the fight against the rising darkness would continue.

Game notes: Nothing really new here so far as encounter design, just a necessary step  in completing the mini campaign. Had the Fiend escaped next up the heroes would put the captured rats to the question perhaps gathering enough clues to proceed to a lair encounter in the (under)city itself.

As mentioned I returned to the original Posse encounter from Six Gun Sound for this game. That encounter was what really "sold" me on Two Hour Wargames when I first played it these many years ago. You see I had been trying out many different sets of western gunfight rules and had started to write my own. The one stumbling block  in all of these rules was how to handle the pursuits so common to the genre. None that I had tried or devised gave the desired feel to the chase.

After playing the Six Gun Sound Posse encounter all that changed and I have been contributing to or writing for THW ever since.

In the original posse encounter, the pursued were always moved on the table. The lead was tracked on paper and when the pursuers got close enough they too would be placed on the table. The beauty of this method is that as/if the lead decreases the pursued have to consider where they are on the table and where they are likely to be when the enemy catches up. Do you hole up in that pile of rocks over there or see if you can eek out a lead and get clean away? 

The drawback to this method is that it involves a lot of table top movement and record keeping. It was not uncommon for the pursued to criss cross the table several times before the pursuers showed up. By way of explanation if the pursued left the table on one edge they simply reentered from the opposite edge. It could make for a long game that never even ended in shots being  fired.

In the current crop of THW games, pursuit is conduced almost entirely off table. Various opposed rolls are made to see whether the lead increases or shrinks and only when it shrinks down to zero are the figures placed on the table. At this point a standard stand up fight encounter is set up and played. The tension of wondering if you will make it to that shack or copse or whatever cover or be caught out in the open is lacking from this new method.

For this game I tried a hybrid approach. Pursuit was conducted on paper until the lead shrank to 24" or less. At this point the pursued entered the table. At this point the moves were still conducted as if in pursuit end the pursuers placed at the lead distance behind the pursued each turn. Fire could be conducted, range and visibility permitting. The game would proceed in this fashion until the lead closed to 6" (test of wills distance), or the pursued decided to turn round and fight off their pursuers.

Well that about wraps it up for now. Sorry for the long design ramble there. Hopefully if you have read this far it was of interest to you!

Until next time, thanks for stopping by!